One of the benefits of version control systems like Git is the ability to track changes made by multiple developers. However, conflicts can arise when two or more people are making changes to the same project. It can take countless hours to resolve conflicts and get our codebase in order.
Handling merge conflicts is a necessary part of the version control process. It’s a good idea to carve out time to understand when and how to use Git merge versus Git rebase when dealing with conflicts. That way, you can resolve conflicts with confidence.
Developers typically create a new branch in Git when developing new features or working on bug fixes. Branches let developers write new code without impacting the rest of the codebase or other simultaneous changes that are in progress.
When their in-progress code is ready for production, they’ll open a pull request to combine their branch with the main codebase. Oftentimes, there will be conflicts with their change and other changes that have been worked on simultaneously.
What Is Git Merge and How Does It Work?
Git merge is one command used to combine branches that have diverged. It adds to your current version control history without changing any existing commits. When a developer merges a new branch into the existing main version, Git sets up a new merge commit, then adds it to the main branch’s history.
The Git merge command combines two branches by retaining all commits made in a feature branch, then saving them to your main branch. In addition to merging two branches, Git merge can squash multiple commits into a single history. When you attempt to combine two branches in Git, the system looks for the two commit pointers and then a common base commit.
Once it finds them, Git automatically sets up a merge commit to combine all the changes you’ve made to a project. The solution relies on a merging algorithm that helps Git perform merge operations and highlight conflicts when they appear.
The Git logic works by first locating a common ancestor within the merge base, which is the first commit that both branches can reach. Git then calculates the difference from that commit to each branch. Next, Git applies those two differences to the merge base to create a new commit.
Example of Git Merge
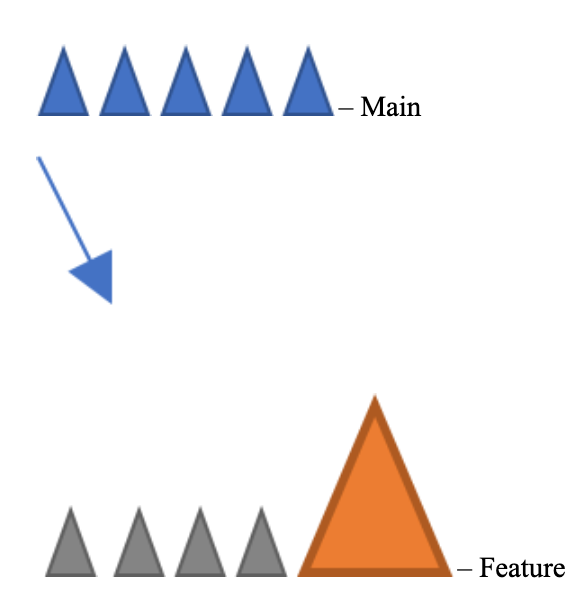
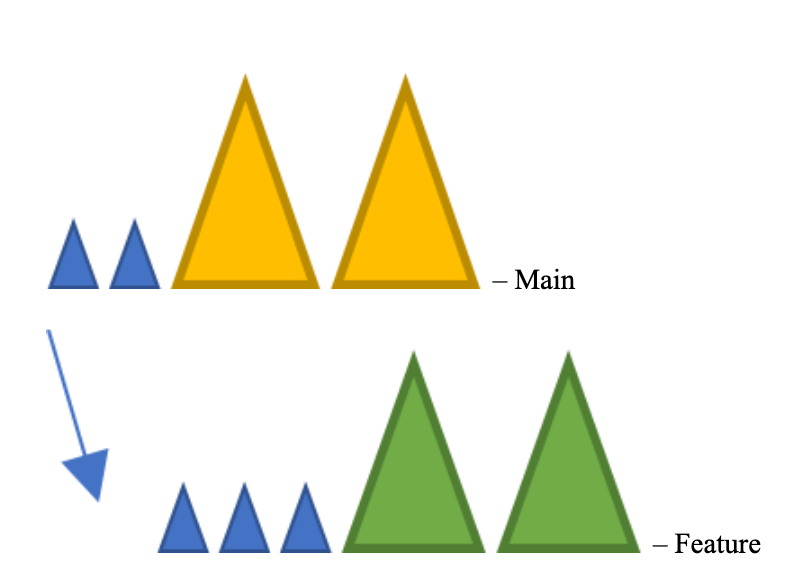
Below is an example of a history where you have a “main” branch and a new branch called “feature,” which diverges from the main branch.
A-->B-->C-->D-->E main

Issuing the command “git merge feature” will bring the two branches back together and add a new commit, represented by the orange triangle.
If you encounter a conflict after setting up the above merge, you’d be able to resolve it with Git pull. The Git pull command will bring in the latest remote changes. From there, you can edit the files to address conflicts. Then add the new updates using a Git –commit command. Finally, you would issue the command "git merge –continue" to resume the merge and work on resolving your conflicts. The –continue flag is optional.
What Is Git Rebase and How Does It Work?
The Git rebase command changes the base of a branch so that it appears to have emerged from a different commit. It’s an alternative way to merge two branches. It’s different from Git merge because it’s a destructive action, which means that it alters the Git history.
It’s used when a developer wants to move or combine sequential commits to a single new commit.
Git sets up new commits and then applies them to a specific base. Your branch is now made up of recent commits, even though it looks the same.
So, when and why would you use the Git rebase command? You need a way to pull in the latest main branch updates without cluttering your history.
Keep in mind that Git merge and Git rebase accomplish the same goal in different ways. The main difference between the two is that your history doesn’t change when you use Git merge. The drawback to this is that you’ll see a lot of commits when you review your history for changes. Things can become rather muddled if you’re working on a large project with multiple developers.
Git rebase rewrites the history of a branch, which makes it appear clean when you’re ready to merge it back to your main branch. Having a clean history for your branch makes it easier to locate specific changes and perform troubleshooting when you have a bug in an application. You can quickly spot the commit that introduced the issue to resolve it faster.
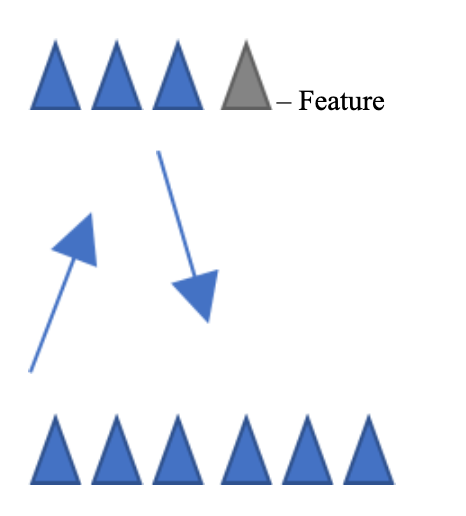
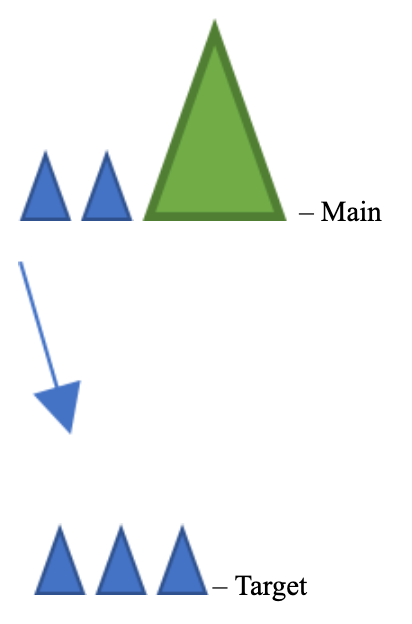
Example of Git Rebase
Git rebasing is a second option for integrating new features into your main branch. Below is an example of how a Git rebase would work. The gray triangle represents the commit with your new features, with the main branch below.
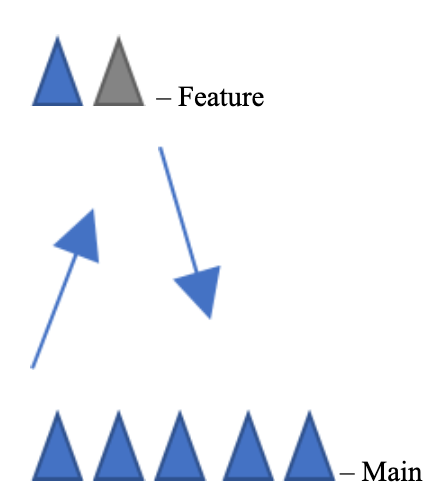
Rebasing integrates changes happening upstream into your local Git repository.
Git Merge vs. Git Rebase
Both Git merge and Git rebase combine changes from one branch into another. Git merge is not a destructive operation. It creates a new merge commit and adds that to the history. On the contrary, Git rebase is a destructive operation. It rewrites the history of the destination branch.
If you’re new to Git, some well-meaning, experienced developer might warn you away from using the rebase operation. However, if you take the time to understand what it’s for, rebase can make life much easier for yourself and your team. Rebasing leaves you with a cleaner history. On the other hand, merge is less tricky to use because there are no changes to your previous commits.
At a high level, Git merge and Git rebase integrate changes from one branch into another. Git merge ties the histories of two branches as shown below:
Merging is nondestructive, meaning it doesn’t change your existing branches. While that’s safer in that you don’t risk messing up your history if you do it improperly, it results in a messier history. You’ll have an extra merge commit whenever you want to bring in new upstream changes. If your main branch receives a lot of updates, that can make your history verbose and complicated.
Rebasing is destructive. It moves the feature branch you’re working on to the front of your main branch and combines all of your commits together. You need to be careful when using Git rebase because you are rewriting your project history. Your original commits in the main branch get replaced with new ones.
When rebasing, you also risk making the mistake of removing comments left by other software engineers. It’s important to be careful when using rebase — often, having a second set of eyes while you go can be a plus.
In addition, it might be harder for another developer to recognize your changes when they issue a pull request. Another potential drawback to Git rebase is that you may find yourself resolving the same conflict repeatedly. It may be simpler to use Git merge and resolve conflicts one at a time.
Yellow represents the original commits, while the green represents the new replacements.
The rebase command moved the old commits from the main branch to new ones in the feature branch. Rebasing makes it easier to walk through your project with other commands like Git bisect because it’s removed previous commits by rewriting the branch history. However, you can really mess things up if you aren’t careful about following the Golden Rule of Rebasing. Essentially, you never perform a rebasing on public branches.
Why not? Think of what would happen if you rebased your main branch commits to a feature branch. Remember, the feature branch is in your workspace, so the changes aren’t passed back to the main branch.
Think of the other developers on your team still using the main branch. Your actions will make Git think you are working with a divergent version of main, which effectively makes part of your project history disappear. You would need to merge them back together to make them synchronous, which means more commits to complicate your history.
Anytime you issue the Git rebase command, ask yourself if anyone else is using the branch. If yes, try looking for another way to accomplish your intended changes. If not, then you should be OK rewriting the history.
Tips on Using Git Merge and Git Rebase
You should complete certain steps before you issue your Git merge and Git rebase commands. First, invoke the command Git status so HEAD points to the correct branch receiving the merge. Then, if needed, execute Git checkout to perform a branch switch. Finally, you must update your receiving branch with the latest remote changes.
Issue the git pull command to pull in your latest remote commits and update your master branch. Finally, execute the Git merge <branch> to merge it into your current main branch.
Git Merge Tips
Fast-Forward Merge
Fast-forward merges occur when there’s a straight path from the tip of your current branch over to the target branch. Instead of performing a branch merge, Git integrates the histories by moving the most recent branch tip to the tip of the target branch. Because all the commits that can be reached from the target branch are now available in the current one, the action results in a combination of both branches’ histories.
Below is an example of a fast-forward merge. Note that the green triangle represents the main tip with the new changes.
Executing a fast-forward merge would result in moving the main tip with all changes up to the target branch. Note that the green triangle moves from the main branch down to the target branch:

Three-Way Merge
Keep in mind that executing a fast-forward merge with diverged branches is impossible. If there is no linear path, Git will have to perform a three-way merge, which ties the histories together using a dedicated commit. Effectively, Git performs three separate commits: one each on the two branch tips, then another on their common ancestor.
Rebase Tips
Git stops a current rebase when there is a conflict and gives you a chance to find a resolution. You’ll see both conflicting files along with markup highlighting the differences. Once you’ve made your changes, you can use the “git add” command on the modified files, then run “git rebase –continue” to complete rebase.
If you want to see what’s happening with a current rebase, you can issue “git rebase –abort” to rewind the history to right before you begin the rebase operation. That way, you can undo any changes to minimize the impacts of your mistakes.
Developers working on a divergent branch for a long time will likely encounter conflicts when they finally try to rebase against the main branch. This is why it’s recommended to regularly pull in changes from main so that your branch doesn’t diverge too far. Ideally, you should rebase your feature branches at least once per day to minimize the possibility of ending up with lengthy conflicts to resolve. Make it a habit similar to brushing your teeth each day.
Keep Your Thoughts in Order With Stashpad
"Why did I do that?" That’s a common refrain of developers when they’re going over a piece of code they’ve written. Use Stashpad to go back and figure out your thought process at the time. The utility also helps you organize thoughts, process information, and work through problem-solving scenarios. Click here to download a free trial for Windows or MacOS.