
At Stashpad, we use Electron to build our desktop app. Electron works great out of the box for most things, and does a wonderful job abstracting away platform specific APIs. But, when we started using some native node dependencies in Stashpad our deployment process quickly grew complex. When we began shipping the app we had a cumbersome manual process. We knew that was something that we had to change for both ourselves as developers, and for our users so that we could ship rapidly.
Our original deployment workflow
For the first versions of Stashpad, we packaged the app for macOS and Windows. We only had a version for Intel chipped Macs, that would run on M1s using Rosetta (a tool for cross-compatibility provided by Apple on all M1s). Because of our native node dependencies (primarily realm), we needed to build on each platform separately to create packaged versions that would run on each platform.
To start, we would log in to each machine and run a build script to kick off the electron-builder packaging process. In turn, the Typescript code would be transpiled and packed into an installer, the installer files would be signed, and then uploaded to a GitHub release with the new version number. While the build script was simple to use, that meant we needed to communicate back and forth (sometimes remotely) to coordinate who was running which build when.
Once all of the packaged versions had been produced, users could go to our GitHub release page and download the newest version to run on their desktop. At that time Stashpad didn't even have automatic updates yet!
Our M1 users (including several Stashpad team members) were reporting performance issues on M1 Macs, so we knew that was something else we had to fix. A first stab we took at this problem was to produce a universal package that would install the correct version for the type of Apple chip on the computer. We discovered right away that having the native node dependencies meant we'd need to package the app separately for M1s and Intel based Macs. So far we weren't accounting for Linux either, bringing the total number of builds we need to run separately up to four. Another manual step in building the release was the last thing we needed, so we set out to create a better process for our team.
The ideal deployment process
There were a few key criteria that we were shooting for when setting up our automated deployment system. We wanted to be able to kick off a release using a single script or command. That command would package for all 4 different systems, create a GitHub release, and upload all the required assets to serve our users. It was also important to establish a release server that would be able to provide auto-updates for our users (more on the server later).
Another goal we had was to create a beta version that we could use internally. On each pull request we'd generate a new release that we could use in our daily work to help catch bugs before they made it out into the world. Everyone on our team would be on this beta channel and using the latest main branch code on a daily basis.
The main choices for packaging an Electron app are electron-builder and electron-forge. We evaluated both as a team and decided to use electron-builder since the documentation was more thorough, and there was auto-update support for Linux (via .AppImage) out of the box, and there seemed to be more hooks into the process which we'd need to customize the signing process for each platform.
electron-builder configuration
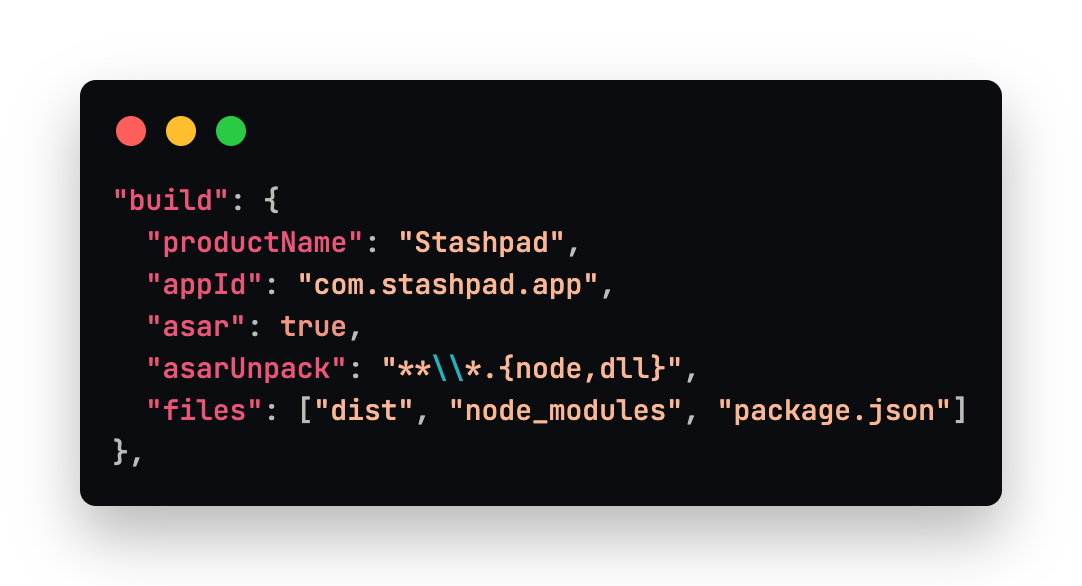
Electron Builder requires some basic configuration for each platform. To see a full example derived from our configuration, check out this gist. Here is a breakdown of the configuration which is included in our package.json file under the section "build".
Basic configuration
The common configuration specifies a productName, and an appId. The product name determines the name of the app when it is installed on a computer. It can be modified later if you wish to rebrand your app. The appId cannot be changed later or auto-updates will not recognize the new version of the app, so choose wisely before distributing your app to users. The asar property specifies that the app's source code should be packaged into an archive, which can speed up the app startup and obscure the source code. Documentation on Electron's website has been removed, but there is a web archived version that explains a bit more. Some native modules need to be unpacked in order to work correctly, specified here by the asarUnpack glob pattern. Finally, we list files that must be included for the packaged app to work correctly.
macOS configuration
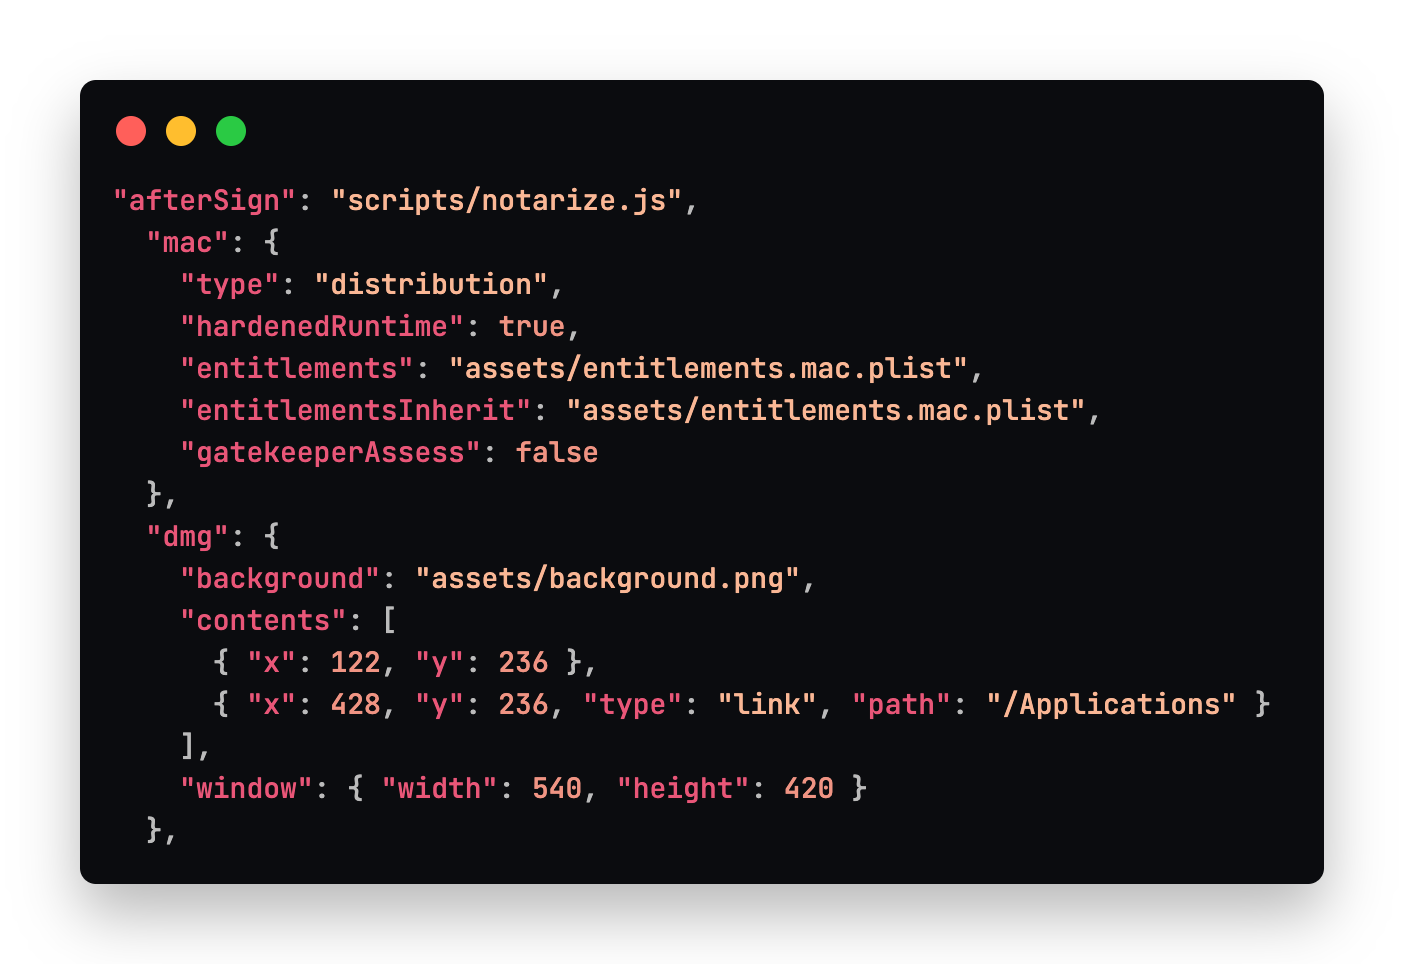
Below our common settings, we specify some macOS specific settings in order to make sure the package can execute on macOS and a custom .dmg screen that the user will see when they install Stashpad. The type specifies that the package is for distribution and not development. The hardenedRuntime protects from some common types of exploits, and is recommended for Electron apps. Standard entitlements for Electron apps to run on macOS are also used. gatekeeperAssess is a setting for the electron-osx-sign library used by electron-builder under the hood. The dmg settings specify the location and background of the dmg window that appears when a user goes to install your app.
Windows configuration
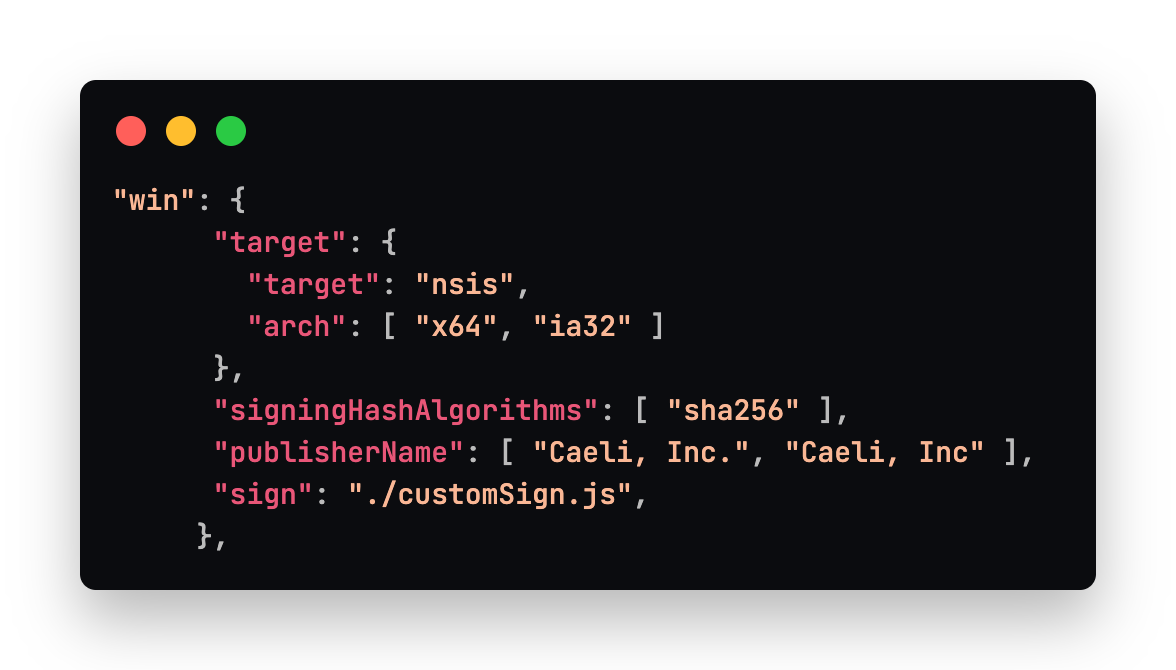
For Windows, we create an NSIS installer which is an .exe that runs and installs the application and associated directories. For code-signing (TODO: link section), some extra settings were needed. To use an EV (Extended Validation) certificate, we created a custom signing script that uses SignTool.exe (provided by the Windows SDK) to access the certificate on a USB token and sign the packaged application. The publisherName and signingHashAlgorithms were also necessary in order to use the EV certificate. More on this later.
Linux configuration
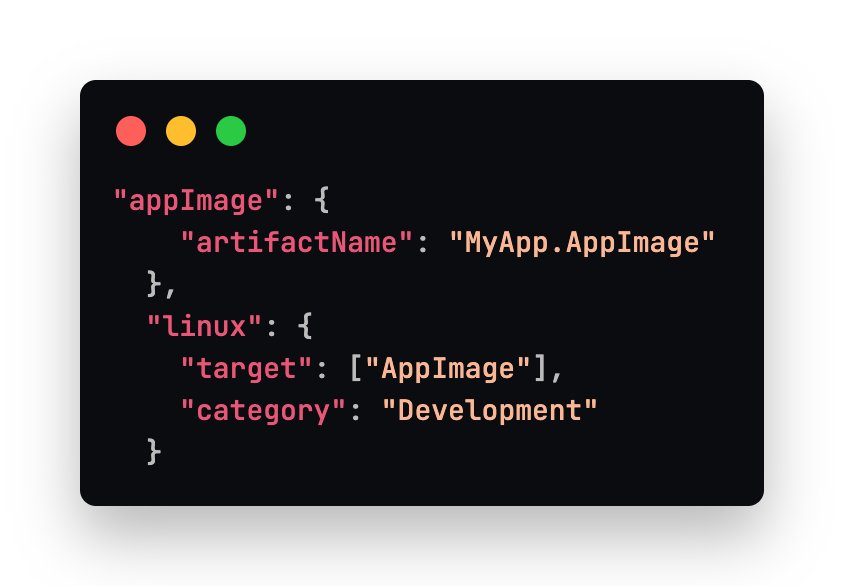
For the Stashpad linux app, we take advantage of the .AppImage format which is a self-contained bundle of the application that will run on most Linux distributions. There is no installation required, the file can be executed directly to launch the application. AppImages also support automatic updates. Here we specify the artifactName so that the packaged version name is stable and users can create a symlink to it without worry of it changing later. By default the version number is included so specifying the name explicitly solves that problem.
See the gist for an example of some optional configuration settings like creating an app specific protocol. We also include some other resources like images in our packaged application.
Setting up GitHub workflows
Now that we've created an Electron Builder configuration that can run on each of the platforms, we can create some GitHub workflows in order to package the app automatically for us. In short we need to bump the app version, package the application on 4 different OSes, and then upload the correct artifacts to a GitHub release for distribution. We are uploading the artifacts to a GitHub release for easy connection to an update server. Most Electron auto-update servers support serving the app bundles from a GitHub releases page so it is a solid choice. Another viable option is to store the artifacts in S3 or another static file store that is compatible with your update server.
Bumping the version
The way we've set up our GitHub workflows is to have a version bump workflow that is responsible solely for bumping the version inside the package.json file and creating a git tag. The version bump flow runs on any push to the main branch. It uses this GitHub action which is made to work with package.json files.
A few things to note in this workflow are the use of a personal access token so that one workflow can start another workflow. When using the ${{ secrets.GITHUB_TOKEN }}, a second workflow triggered by this one would fail to start. The secondary build/app/package.json is also specified so that the one containing the native modules is responsible for holding the app version number. Finally, you may notice that we have configured the version bump action so that it defaults to incrementing the rc version and requires a special string to bump the patch version. We only include the [level]-sp-protected string in commits made by our releasing script.
Packaging and drafting a GitHub release
In a second workflow, we handle building the release, and pushing it into a GitHub release. For brevity, file paths and standard steps like checking out the repo and installing node have been excluded and replaced with [...]. We need to build packaged versions on 4 different OSes and then publish them to GitHub. An intermediate step here is to upload the artifacts we'll need to include in the release to the Artifacts system in GitHub which is the recommended way to move files and metadata between jobs in GitHub workflows. Since the packages are coming from four different runners, we can use GitHub Artifacts to move them to the final job which drafts the GitHub release.
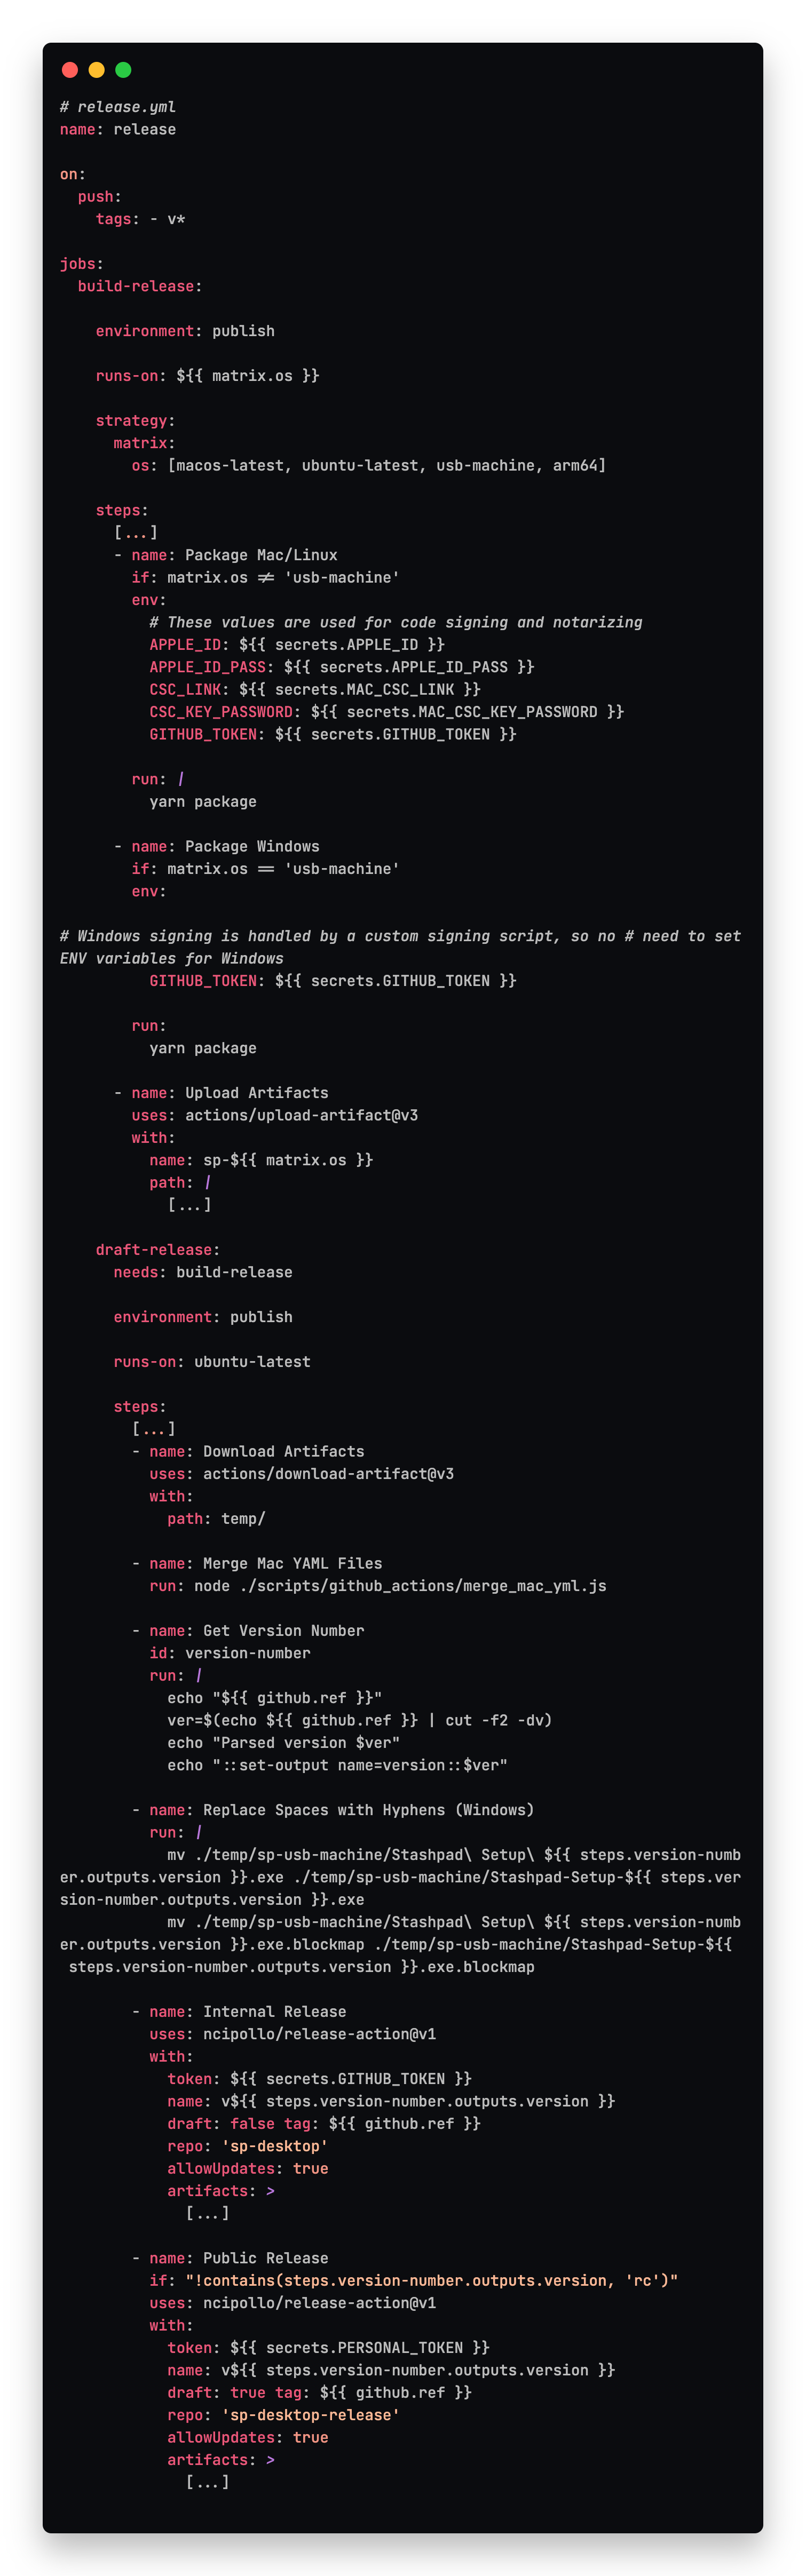
Notably in this workflow, the strategy.matrix.os defines arm64 and usb-machine which are two arbitrary labels we've created and applied to our self hosted runners. The arm64 label is used for our M1 development laptops, and the usb-machine label is the Windows machine with the EV certificate USB token plugged into it. We also set some environment variables used by electron-builder for signing and notarizing the macOS app.
Once we move to the draft-release job which depends on all 4 instances of the build-release job finishing, all the artifacts are downloaded. A couple steps massage the file names and contents to get them ready for publishing. We merge the two separately generated latest-mac.yml files into a single one that the electron-updater package will understand when communicating with the update server. We also replace spaces in the file names generated by Windows for easier reference in a linux system. Finally we create the release in the appropriate GitHub repo depending on which type of release we're making.
macOS builds for x64 and arm64
As previously mentioned, we are running two separate jobs to package the application for the different types of macOS architectures. While some of the native modules that we use offer prebuilt binaries we could bundle into the app, not all of them do. In this case, we found that it was simplest to build on both types of machines. GitHub actions does not currently offer a hosted M1 runner, so we needed to set up a self hosted one to pick up the job.
Setting up a self hosted GitHub actions runner
GitHub has excellent instructions for setting up your own self hosted runner. It requires only a few steps to download and install on your machine. It worked perfectly out of the box on macOS. We set up several of our development machines under the same arm64 label so that someone's machine was always ready to pick up the job. The runners are setup as a service on the machine so they are always listening and restart automatically after restarting the computer. When running a build in the background we haven't noticed any performance issues on our development machines. We'll have to repeat this process for our Windows builds shortly.
Apple certificates for code signing
In order to distribute an Electron application on macOS, you need a couple of certificates to be used by electron-builder when signing the application. For distribution outside of the App Store you need a Developer ID Application certificate and a Developer ID Installer certificate. These certificates can be obtained from the Apple Developer site. It costs $99/year to maintain an Apple Developer account. The Developer ID Application certificate can be base64 encoded for use in a CI environment and set as the CSC_LINK environment variable for electron-builder to use. Don't forget the accompanying CSC_LINK_PASSWORD as well. electron-builder provides more instructions in their documentation.
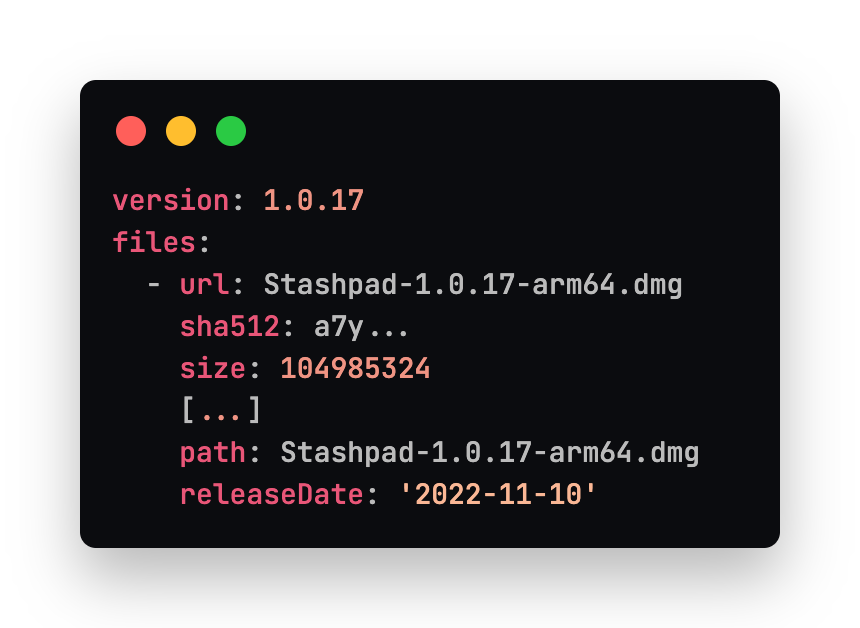
Since the macOS builds are produced on different machines and unaware of each other, we need to merge together the latest-mac.yml files that each separate process produces. The files are small and simple. The one produced by the arm64 build lists the files created and when they were produced. There is also a SHA512 checksum of the file used to validate it when it's downloaded by electron-updater. To combine the files, combine the files and their metadata from both latest-mac.yml versions. It doesn't matter which version the path specifies, and the release date will be the same in both files. The files array will also include references to the .dmg.blockmap files which should be included in the final version of your latest-mac.yml file.
Windows build
Similar to macOS, Windows builds must be produced on a Windows machine. While there are some techniques to build in a VM, they only apply if you're building manually outside of a CI environment like we were doing at first. When we first moved to building the Windows installer in a CI environment, we were using an OV (organization validation) certificate which is a .pfx file that can be exported and used on any computer. The .pfx file can be base64 encoded in a similar fashion as the macOS certificate. Then, you can consume it from any GitHub action as an environment variable.
With the use of an OV certificate, which is the only type mentioned by Electron Forge and recommended by Electron Builder, there is a warning presented to the user both on download and then again on execution of the .exe installer. In both cases, the warning has a button hidden inside the dropdown that allows the user to proceed anyway. It seems any reasonable user would be scared off by the dual warnings - even more so by a company that is new and has not established a strong reputation among users yet. The warning is meant to go away after an unspecified number of downloads (~100-500), however the count starts over for every new version of the app you package. That means that the first 100 or more users who download each new version of the app will get an ominous warning.
To remove the warnings that users get when downloading your app signed with an OV certificate, you need to obtain an EV (extended validation) certificate. The extended validation part means a more extensive background check with your certificate authority. Once you've passed the background check, the certificate will be physically mailed to you in the form of a FIPS 140 compliant USB token. The USB drive must be plugged into your Windows machine in order to sign the the application. Electron Builder has a setting you can use if you want to do this step manually. Since our goal is automation of this process we had to find a way to work within these requirements.
A self hosted GitHub actions runner for Windows
The instructions for installing the self hosted runner are fairly similar for Windows. When installing the runner, a couple of settings need to be tweaked so that it can easily work with node and yarn installed on the machine. When you are setting up the runner and you are prompted with which Windows account to use, you can specify the NT AUTHORITY\SYSTEM account instead of the NT AUTHORITY\NETWORK SERVICE. While the system account has more priveleges it makes for a simpler setup when installing the service. Please be sure to understand the consequences of elevating the priveleges of the runner on the machine you're using. Consider what other information is on the machine, what network it is on, and what information could be accessed if it was compromised since the NT AUTHORITY\SYSTEM account has full access to the computer.
Codesigning for Windows
The way that we've set up our Windows build is to run the job on a Windows machine that has the USB token plugged into it at all times. The runner is also a service so it is always listening for jobs to pickup, even after a restart. Since we're using the EV certificate (on a USB token), the runner can only be installed on one machine, though we've found the self-hosted service to be reliable with minimal maintenance.
The EV certificate comes with a GUI tool that you're meant to use for entering the password each time you use the certificate to sign a file. To bypass the GUI tool altogether, you can use [SignTool] which is provided by the Windows SDK, as well as Visual Studio. Installing the community edition of Visual Studio is all you need. To hook into Electron Builder's signing process, you can provide a custom signing script. We've specified the file in the package.json. It works as follows.
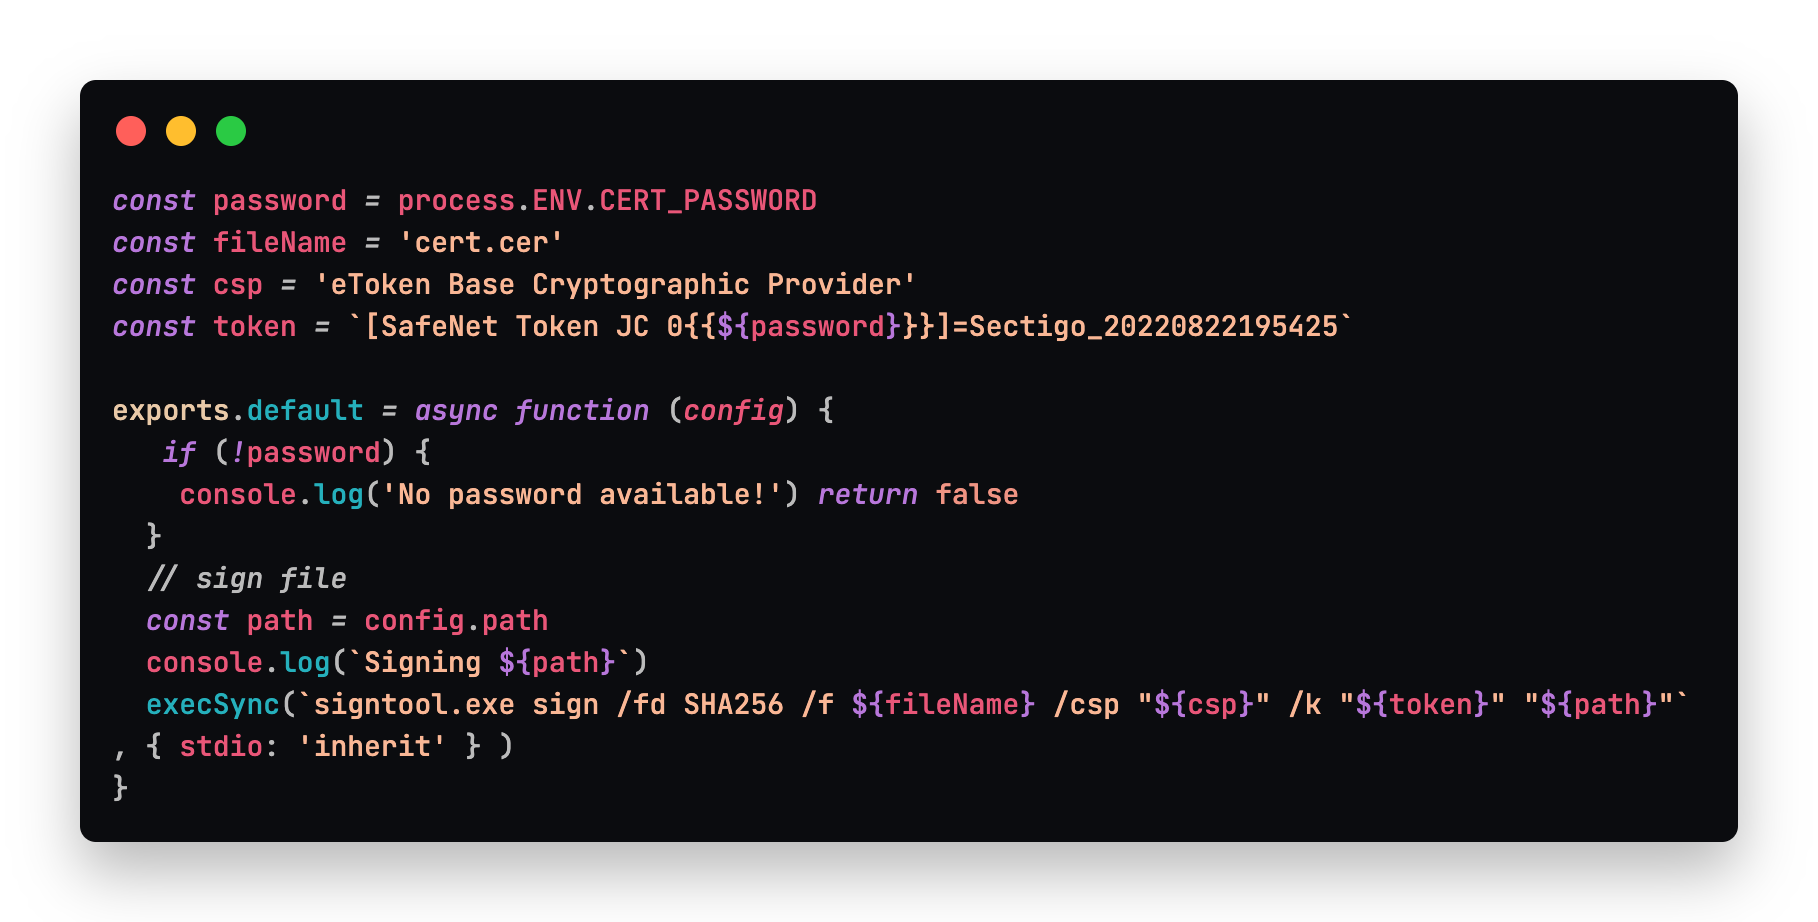
We make sure to bail if the password is available in the environment, since attempting to sign with the wrong password will lock you out of the token after a few tries. This solution is based on the accepted answer in this wonderful stack overflow thread which explains how to get the other values you need here like the CSP and token name. It is possible to "export" the .cer file from the GUI tool so you can get this extra metadata, though it will still need to be plugged into the computer to use it.
Linux build
Building for Linux is relatively fast and easy. We use the ubuntu-latest runner provided by GitHub Actions to produce an .AppImage which is self contained and can be run on most Linux distributions. The main reason we chose to distribute our Linux version as an .AppImage is that electron-updater supports it for automatic updates which worked great out of the box. The only thing we needed to configure was the artifactName, which we specified without a version number so that updates for existing users would have a stable name and they could create .desktop icons for it, or symlinks to the file - whichever works best for their workflow.
GitHub Releases and update server
Once all of the build artifacts are uploaded to a GitHub release, we are able to connect our update server to it. We used the popular update server Hazel for a while, but found that it did not work well with private repos and was geared towards the autoUpdater built into Electron which does not support automatic updates on Linux. It has also not been maintained by Vercel, and since it works with their setup for Hyper, there is no need to make any additions to it.
Since Hazel was pretty small and easy to wrap your head around, we rewrote it with our preferred technologies, namely Typescript and Express. We also added support for using private repos and using it with electron-updater. Our update server Chestnut is open source and has been running reliably for us over the past months.
Summary
We learned a great deal about differences in distributing Stashpad to different platforms. Regardless of the language or framework you use, whether your app is web based or a desktop solution, there are always bumps in the road to deploy your application. For many developers, having a fully automated deployment system is achievable after poring over documentation and stitching together the pieces required to make it work. Once you've finished the grind of setting up an automated system, the last thing you want to do is write about it. We hope our story can shed some light on how to modify your Electron deployment process. If you're not an Electron user, then you may be able to appreciate moving past the shoestring and bubblegum phase of deployment.
Note: After many years of separated development, Electron has recently adopted Electron Forge v6 as the official build tool for Electron apps. We're excited about this development in the Electron space and look forward to continually evolving our build system to adapt to best practices for Electron apps.
Photo by Chris Ried on Unsplash